
Wednesday, 26 August 2015
More Home Decor - Wrought Iron Bench Make-Over
I bought this wrought iron bench thing cheap on Ebay a while ago, in need of a make-over. I cleaned it up and touched up the black finish, then had a seat cushion cut from foam and bought some cream and mink fabrics (from Dunelm Mill). I made the seat cushion cover, bolster cushions and square throw cushions (except the patterned ones. I already had those). It looks brand new now. Another Ebay bargain! (And by the way, the table next to it was by best Ebay bargain ever, at just £2!!)
Sunday, 23 August 2015
Winter Tote Bag
I like the size and softness of this slouchy winter tote bag I made. The fabric is a lovely textural one from Dunelm Mill, made up of strips of chenille and a silkier black cloth. I made the handles extra long for comfort and there's an inside pocket as well as an outside front pocket.


Sunday, 16 August 2015
Paper Patchwork Picture - Bargain Home Decor
Well, it's been a long while, but I'm finally back to blogging. What have I been doing all this time? Well, I have been quite busy. I've done a bit of painting, some card-making, and plenty of home décor and sewing. My sewing skills have definitely improved (thanks to help from books and online tutorials) so I've progressed from very basic projects to slightly more advanced ones.
I've also made a few more changes in my studio, which now looks like this:

I made the large framed pictures myself, using free samples of wallpaper from a DIY store.
I love the look of patchwork, so I cut the wallpaper samples into 2" squares, and laid out a patchwork design that I liked, using whole squares and half-square triangles.

Working on a large sheet of graph paper as my base layer (to keep the lines straight), I stuck all the paper pieces down, then added some extra detail using small flowers punched from the same papers. I added faux stitching all over (using a gold gel pen).

Finally, I added a border made from more scraps of wallpaper and mounted the whole thing on a large sheet of chocolate brown cardstock. Once framed up, it looks great!

Monday, 24 March 2014
Tea Towel Tote Bag
Now I finally have somewhere to set up my sewing machine, I've been busy trying to improve my very basic sewing skills! I stitched this simple tote bag out of two (new) good quality tea towels (the appliquéd heart was already there - far too fancy for the kitchen!)

Monday, 10 March 2014
New House, New Studio...
.jpg)
It's been AGES since my last blog post, but I've been busy! We moved house in the Autumn and have been getting the new house decorated and sorted out. It's all finished now, and I'm lucky enough to have a whole craft room / studio all to myself! I had a tiny budget to decorate it so I just bought some cheap curtains and accessories, all in a bright, cheerful apple green colour. I also bought two rolls of wallpaper and used them to cover some storage boxes and files, and to create 'splashbacks' for the work surfaces (because I like to spatter paint!) Total spend on the make-over: about £75.
Before....
.jpg)
.jpg)
And After....

.jpg)
It's my favourite place in the house - I love putting some music on and getting creative in there! And the best thing of all is that when I've finished, I can close the door on all the mess!
Sunday, 11 August 2013
Flowers at Sunset

I'm continuing to try out different shapes/sizes and colour combinations, so today I'm using a background of sunset colours instead of greenery. Also trying out a tall thin format, which might work well on a card.
II used the same simple techniques as before, but with different colours. Wishy washy background to start with, and once that was completely dry, some simple flower shapes painted over the top.

I added some stems using a water-soluble pencil, with little knots under the flower heads and some extra ones to add some buds.

I then used painted water onto the stems to activate the water-soluble pencil, and painted in the buds and the one flower centre. A quick crop to trim off the mess, and voila!

I used a similar background for some more Alliums (which are really fun to paint)...

It looked like this at the halfway stage:

More Flowers, Layer by Layer
I'm still enjoying painting flowers with watercolours, and am trying out different shapes and colours. Printed onto velvet paper, this one should work nicely on a card or notelets.
 I remembered to scan this one at every stage from beginning to end. The very first thing I did was do some practice sketches to get a feel for the shapes of the flowers:

To start painting, I sloshed on a very wishy washy background using watercolour paint.
I left that to dry and then sketched in the flowers and stems using water soluble pencils:

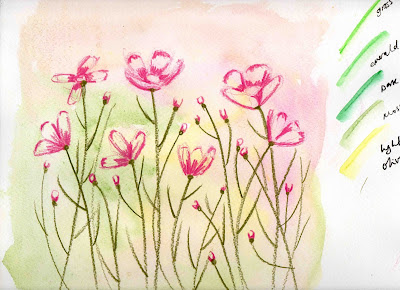
I then painted in some translucent background leaves/stems using watercolour paint, and painted the flowers (except the centres) using watercolour paint over the soluble pencil (the pencil and paint merge together):

I finished off by painting in the yellow centres of the flowers, then masking them off and adding paint spatter. I also cropped the picture to a nice card-friendly square shape:

It's my friend's birthday this week so I might make a set of little notelets as a gift for her.
Subscribe to:
Posts (Atom)